tmux Basics: Your Agent Control Center
Why tmux matters for agent work, and how to build your first multi-pane workspace from scratch
What you'll learn
The Problem tmux Solves
Picture this: you fire up an agent team. Four agents spawn. All their output dumps into one terminal. You can't tell which agent said what. You can't scroll one agent's output without losing another's. You're flying blind.
This is exactly what happens without tmux. Everything — the lead agent orchestrating tasks, the three subagents doing the actual work, error messages, tool calls, status updates — all of it collides in a single scrolling stream. It's unreadable after about thirty seconds.
tmux solves this by giving each agent its own pane. You see all of them at once, side by side. You can scroll one agent's history while the others keep running. You can zoom in on the agent that's stuck without losing context on the others.
There's a second reason tmux matters: persistence. If your SSH connection drops, if your laptop sleeps, if you close your terminal by accident — your agents keep running inside tmux. You reattach and find them exactly where you left them.
Claude Code literally spawns agent teammates into tmux panes. No tmux means no split-pane visibility — you're back to one interleaved output stream. If you're serious about running agent teams, tmux is the infrastructure that makes it possible to observe what's happening.
The Mental Model: Sessions, Windows, Panes
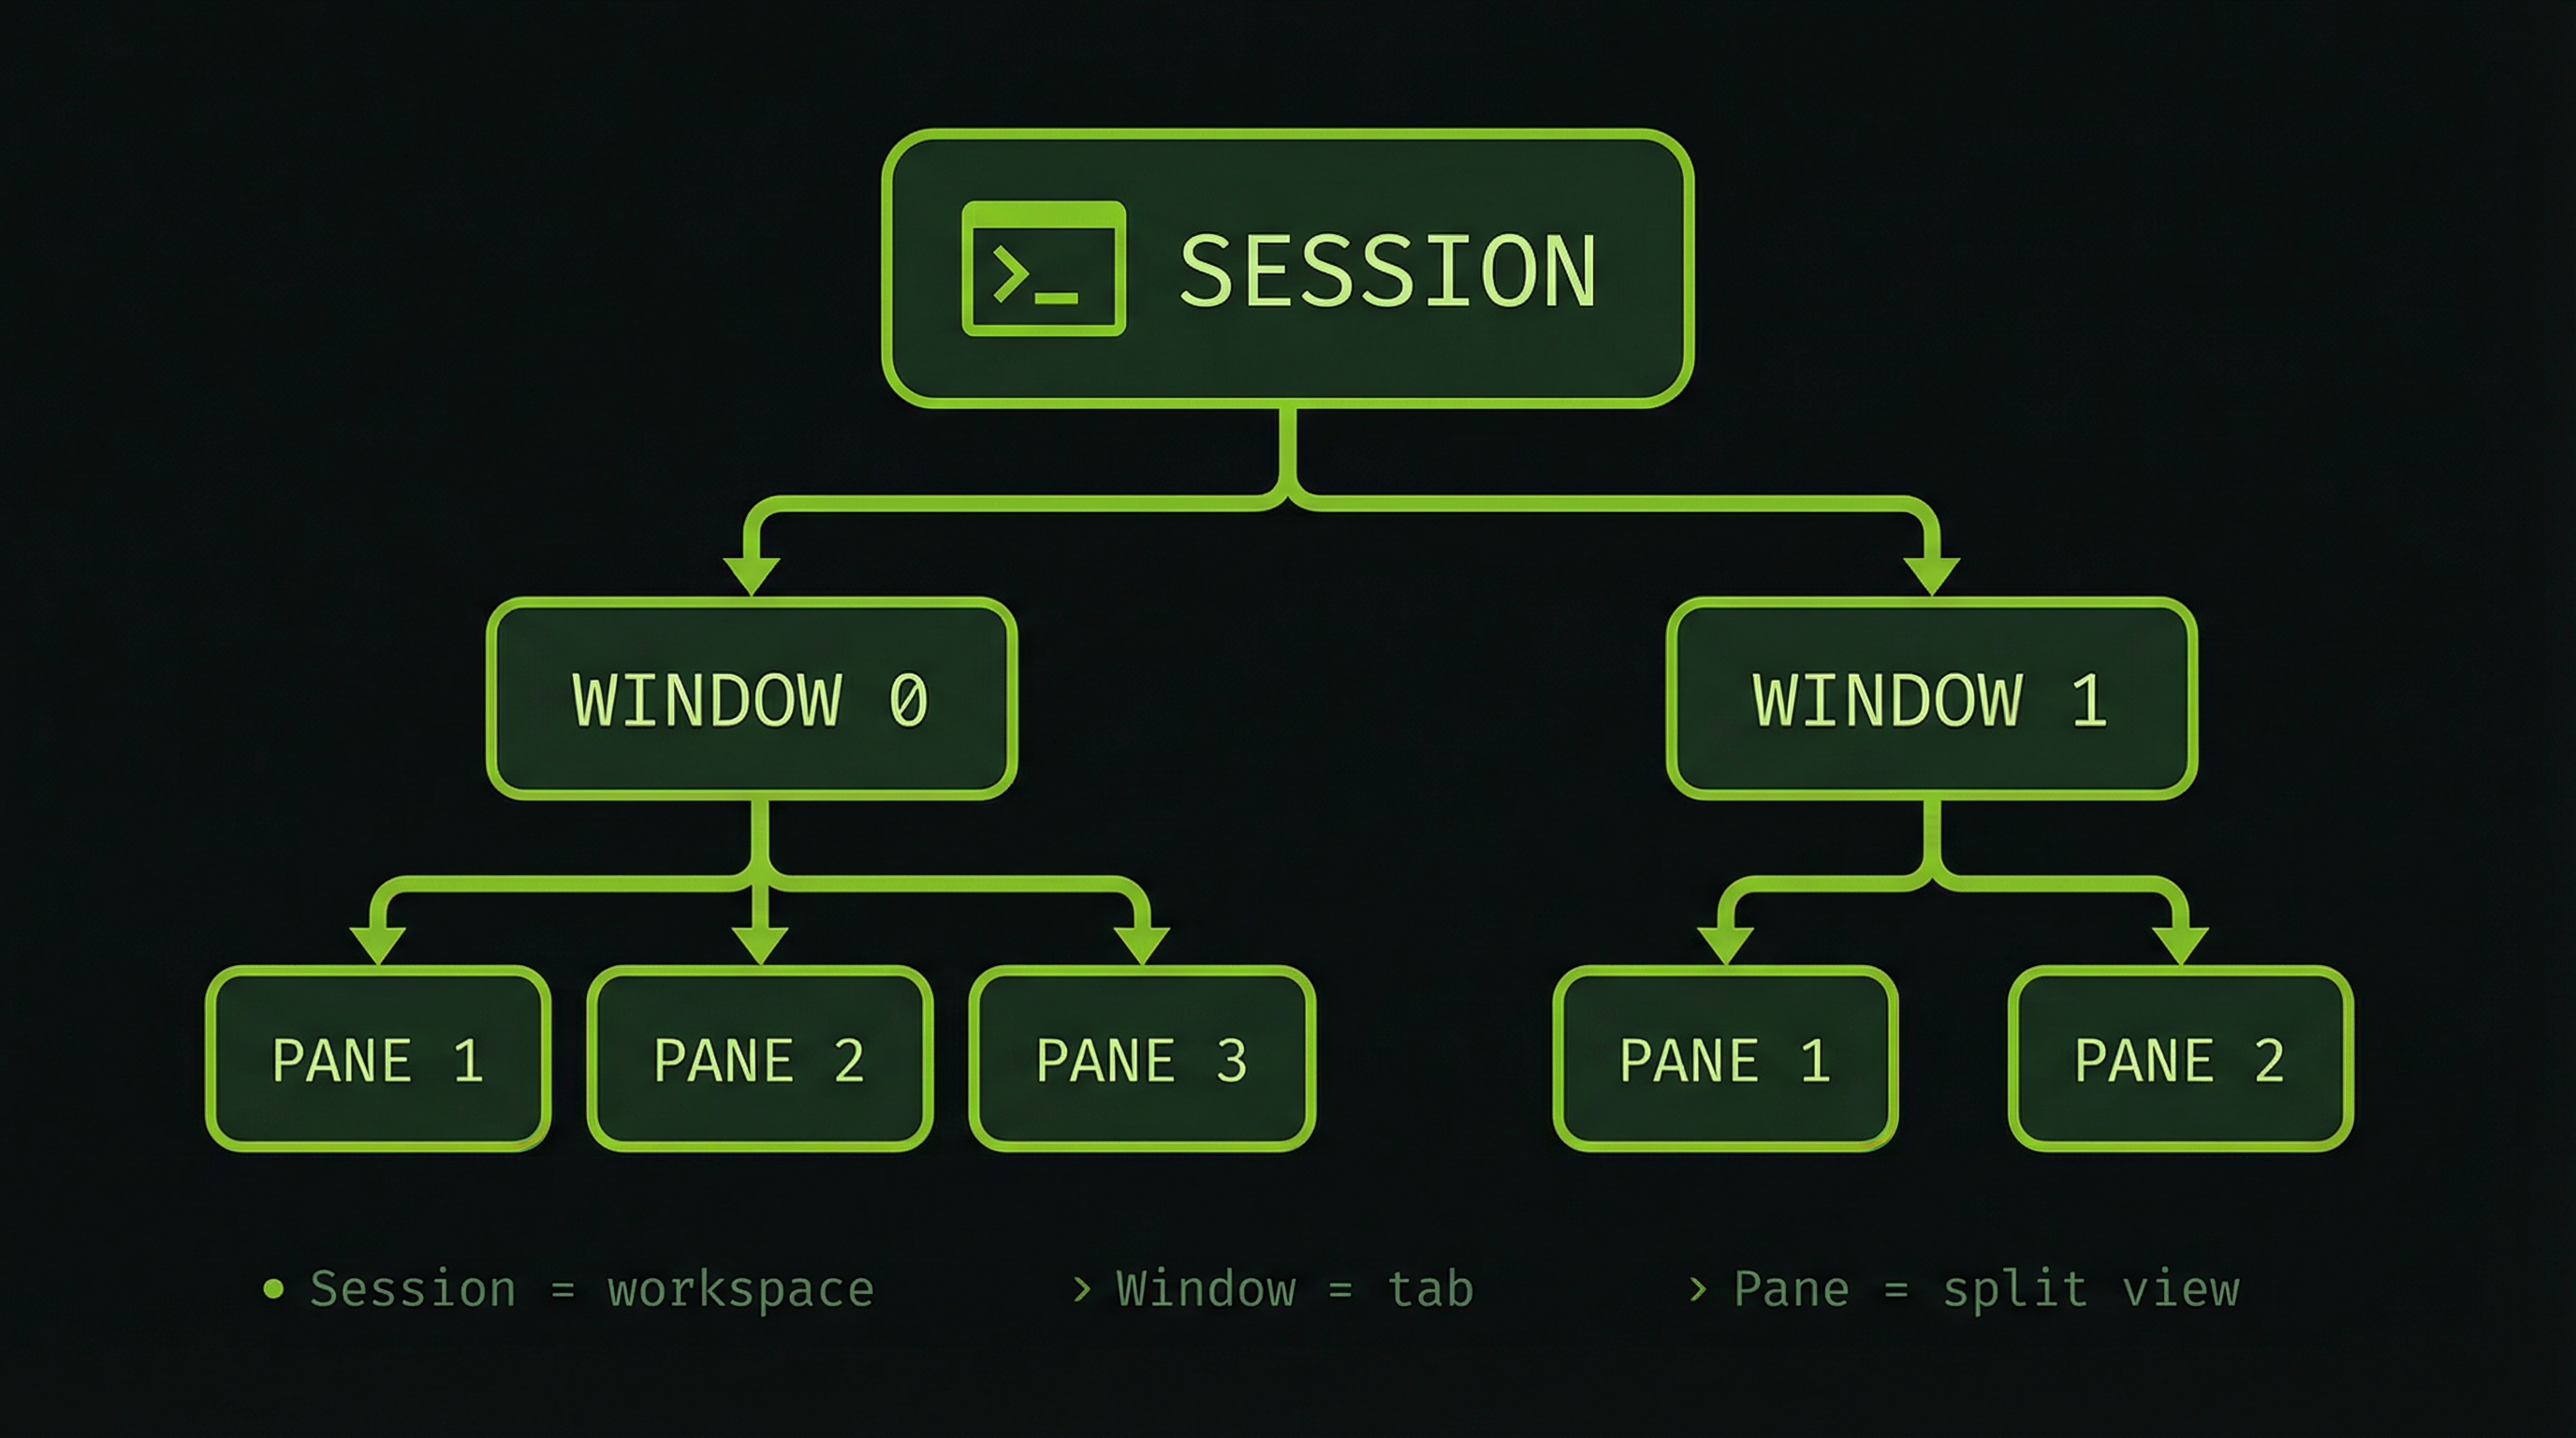
Don't memorize definitions. Instead, think about building a house:
- Session = the building. Your entire workspace. It persists even when you disconnect. You can have multiple sessions for different projects.
- Window = a room. A full-screen view inside your session. You can have multiple windows and switch between them like browser tabs.
- Pane = a desk within a room. Split the screen so you see multiple things at once. This is where agents live.
This is the hierarchy Claude Code uses. When it spawns an agent team, it creates one pane per agent, all within the same window, so you see them side by side.
The Prefix Key: Your tmux Remote Control
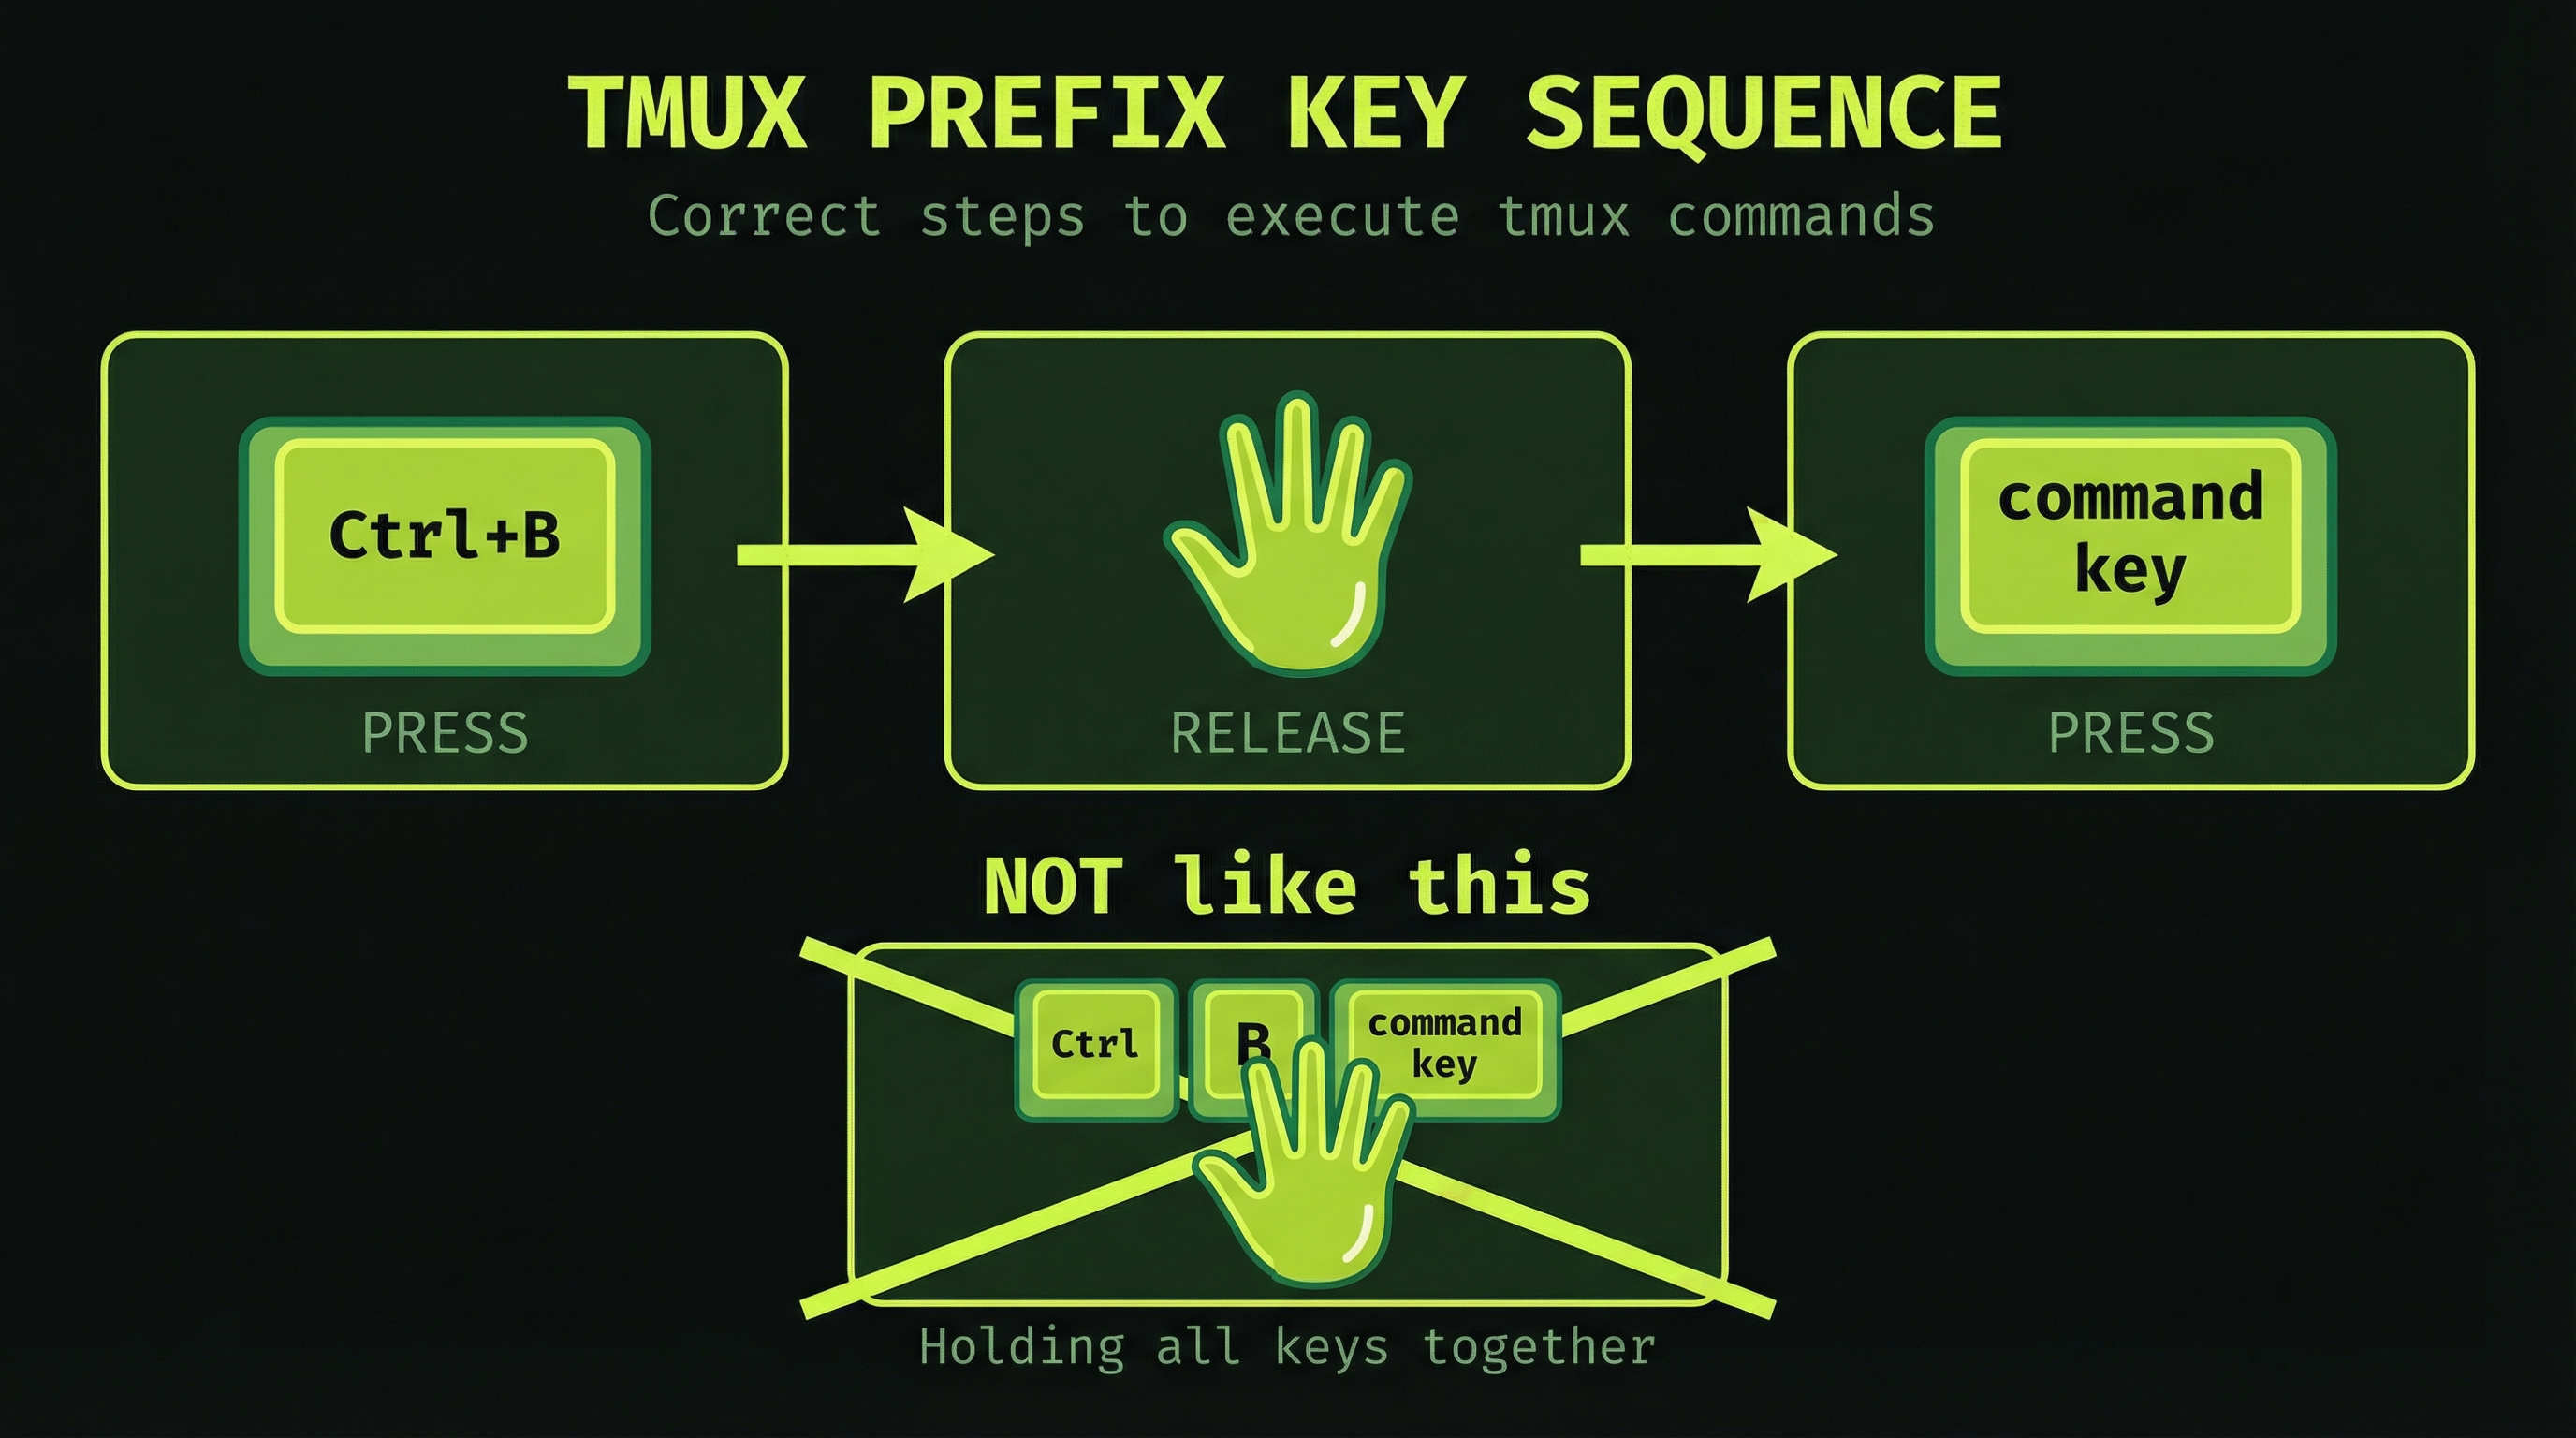
Every tmux command starts with Ctrl+B — the prefix. Think of it like a "shift key for tmux." You press it, release it, then press the command key.
Press-release-press. Not hold-all-together. This is the number one thing that trips people up. Press Ctrl+B, let go of both keys, then press your action key.
That's the entire input model. Everything you do in tmux starts from there.
Exercise 1: Your First Session
Start a named session
Open a fresh terminal and run:
tmux new -s claude-workspaceYou're now inside tmux. The green bar at the bottom is your status line. It shows your session name on the left (claude-workspace) and the window name on the right. You're in window 0.
Everything you type runs inside this tmux session. It looks like a normal terminal — but it's not. It's a persistent workspace that survives disconnects.
Exercise 2: Create Panes
Split the screen into multiple panes
These are the two commands you'll use constantly:
# Split horizontally — creates a pane above and below
Ctrl+B then "

# Split vertically — creates a pane left and right
Ctrl+B then %
Try it now. Press Ctrl+B then ". Your terminal splits into two horizontal panes. Now press Ctrl+B then %. You have three panes.
To move between them:
# Move focus to the pane in that direction
Ctrl+B then arrow keys
Navigate to each pane and type something different — echo "pane one", echo "pane two", etc. They're completely independent shells. This is exactly what happens when Claude Code spawns three agents.
Exercise 3: The Four Commands You'll Use Every Day
Forget comprehensive reference tables for now. These four are what matter:
| Keys | What it does |
|---|---|
| Ctrl+B then " | Split pane horizontally (top/bottom) |
| Ctrl+B then % | Split pane vertically (left/right) |
| Ctrl+B then arrow | Move focus to the pane in that direction |
| Ctrl+B then [ | Scroll mode — review output history. Press q to exit. |
Scroll mode (Ctrl+B then [) deserves special attention. Agent output scrolls fast. By the time an agent finishes a task, the relevant lines are long gone. Scroll mode freezes the pane so you can page through everything that happened. Use arrow keys or Page Up/Down to navigate. Press q to return to the live terminal.
You want these four shortcuts to feel automatic before you run your first agent team. If you have to think about how to enter scroll mode while agents are running, you'll miss things. Practice them now while nothing is at stake.
Exercise 4: Build Your Agent Monitoring Layout
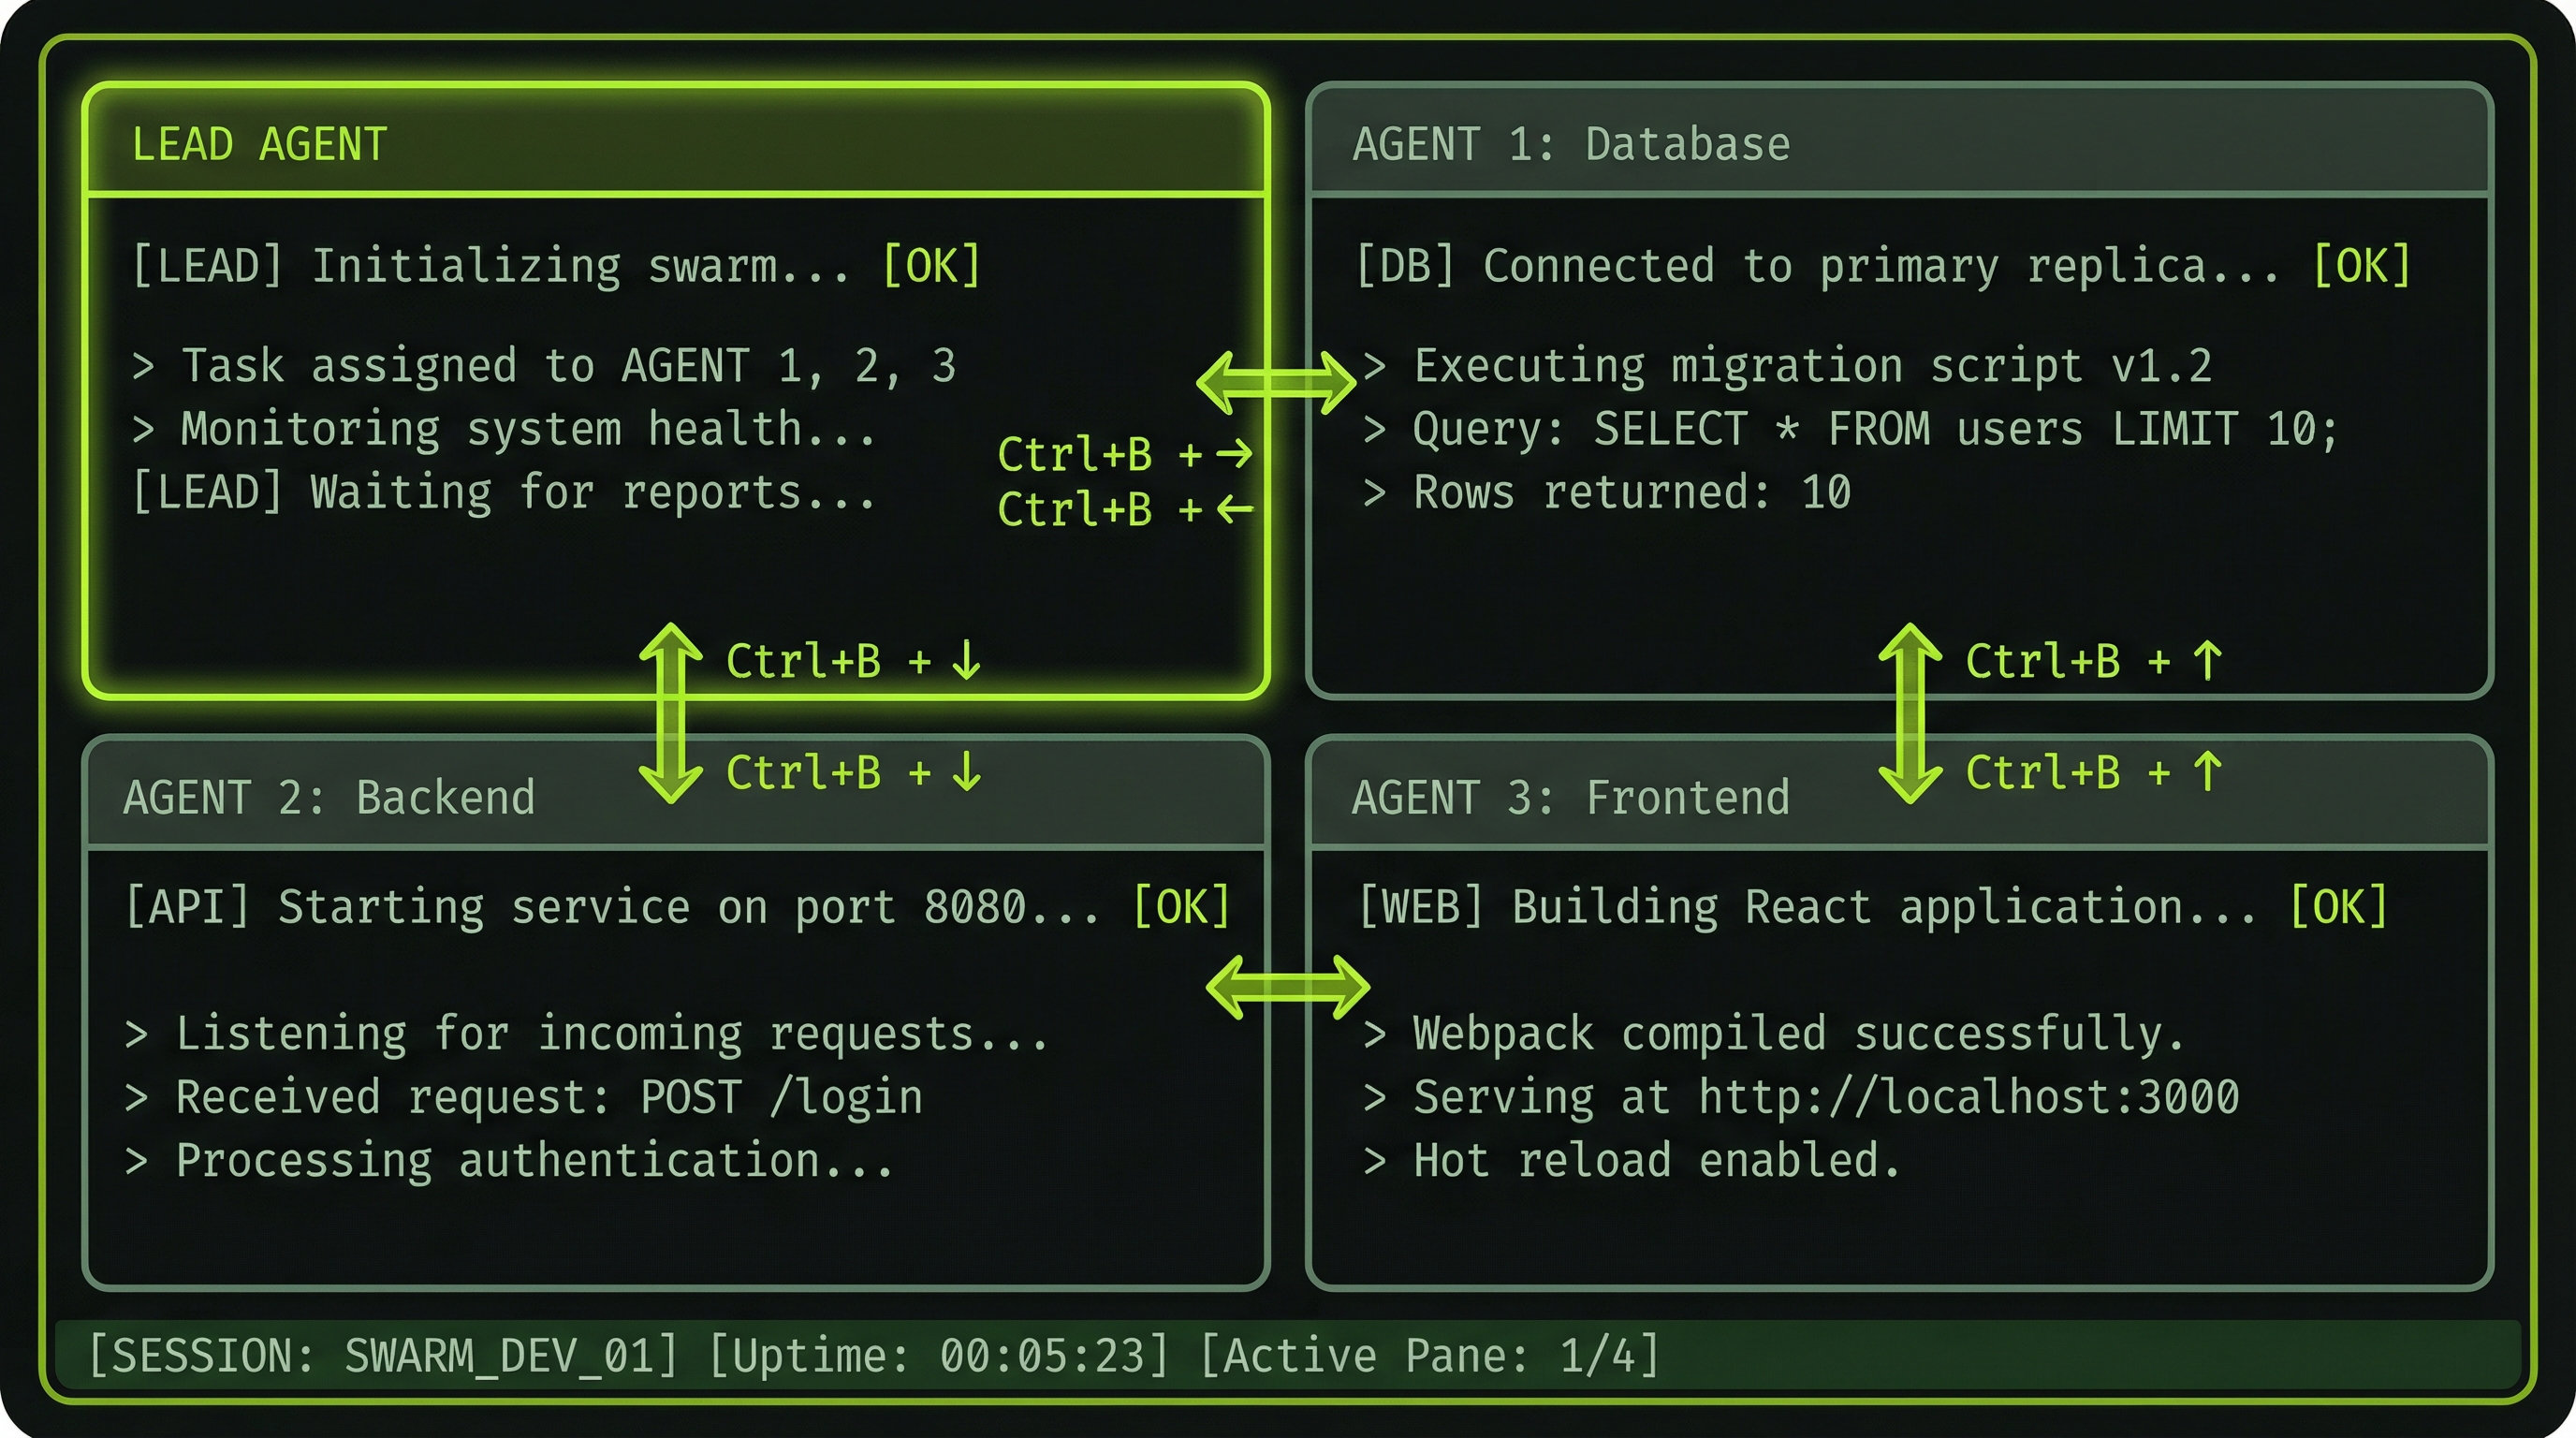
Create a 4-pane layout
This is the layout you'll see when Claude Code spawns a team of four agents. Build it yourself so you understand what you're looking at when it happens automatically.
Start fresh in a new session:
tmux new -s agent-practiceNow build the 2x2 grid, one step at a time:
Ctrl+B then "        # split into top pane and bottom pane
Ctrl+B then Up       # move focus to the top pane
Ctrl+B then %        # split top into top-left and top-right
Ctrl+B then Down     # move focus to the bottom pane
Ctrl+B then %        # split bottom into bottom-left and bottom-right
You now have four panes arranged in a 2x2 grid. Practice navigating between all four with Ctrl+B plus arrows.
Now label them. Navigate to each pane and run:
echo "Agent 1 — Lead"
echo "Agent 2 — Backend"
echo "Agent 3 — Frontend"
echo "Agent 4 — Tests"
This is what you're looking at when Claude Code runs a real team. The difference is that Claude creates this layout for you — but now you understand exactly what it built.
Exercise 5: Scroll Mode in Practice
Review output history with scroll mode
Go to any pane and generate some output to scroll through:
ls -la /
cat /etc/hosts
Now enter scroll mode:
Ctrl+B then [The status line changes to show you're in scroll mode (you'll see a line count indicator). Use:
- Arrow keys — scroll line by line
- Page Up / Page Down — scroll faster
- q — exit scroll mode and return to the live terminal
This is how you'll review what an agent did after it finishes. You'll use this constantly. An agent completes a task, its pane goes quiet — you enter scroll mode to read through exactly what it did and what it reported.
Detach and Reattach
This is the persistence story. Try it now:
# Detach from your session — agents keep running
Ctrl+B then d

# Back in your normal terminal. List running sessions:
tmux ls

# Reattach to your session:
tmux attach -t agent-practice
When you pressed Ctrl+B d, tmux detached you from the session but the session kept running. Everything inside it — all the panes, all the processes — continued without you. tmux ls shows it's still there.
For long-running agent teams, this matters enormously. You can detach, close your laptop, come back the next morning, reattach, and your agents are still there. If you're SSHed into a remote machine, a dropped connection doesn't kill your agents — they're safe inside tmux.
What Claude Code Does With tmux
Everything you just did manually — Claude Code does automatically when it runs an agent team.
When you enable agent teams and run Claude Code inside an active tmux session, the lead agent creates a pane for each teammate. It names the panes, arranges them, and starts routing each agent's output to its own pane. You don't split anything manually. You just watch.
But knowing how tmux works means you can do more than watch. You can navigate to a specific agent's pane mid-run, enter scroll mode to review what it did ten minutes ago, zoom in on a single agent with Ctrl+B z, or interact with an agent directly if you need to intervene.
The next module covers enabling agent teams in Claude Code and watching this happen for real.