Automating Your Workspace
Define your agent monitoring layout in YAML and launch it with one command
What you'll learn
The Problem: Manual Setup Gets Old Fast
In module 2, you built a 4-pane layout by hand. That took about six keystrokes. Now imagine doing that every morning. Or after every reboot. Or switching between a frontend project and a backend service that need completely different layouts — different number of panes, different starting directories, different commands pre-loaded.
Manual setup has a hidden cost: you have to remember exactly what to build each time, then execute it without mistakes. When you're about to run an agent team, the last thing you want is to spend three minutes configuring panes before you've done any actual work.
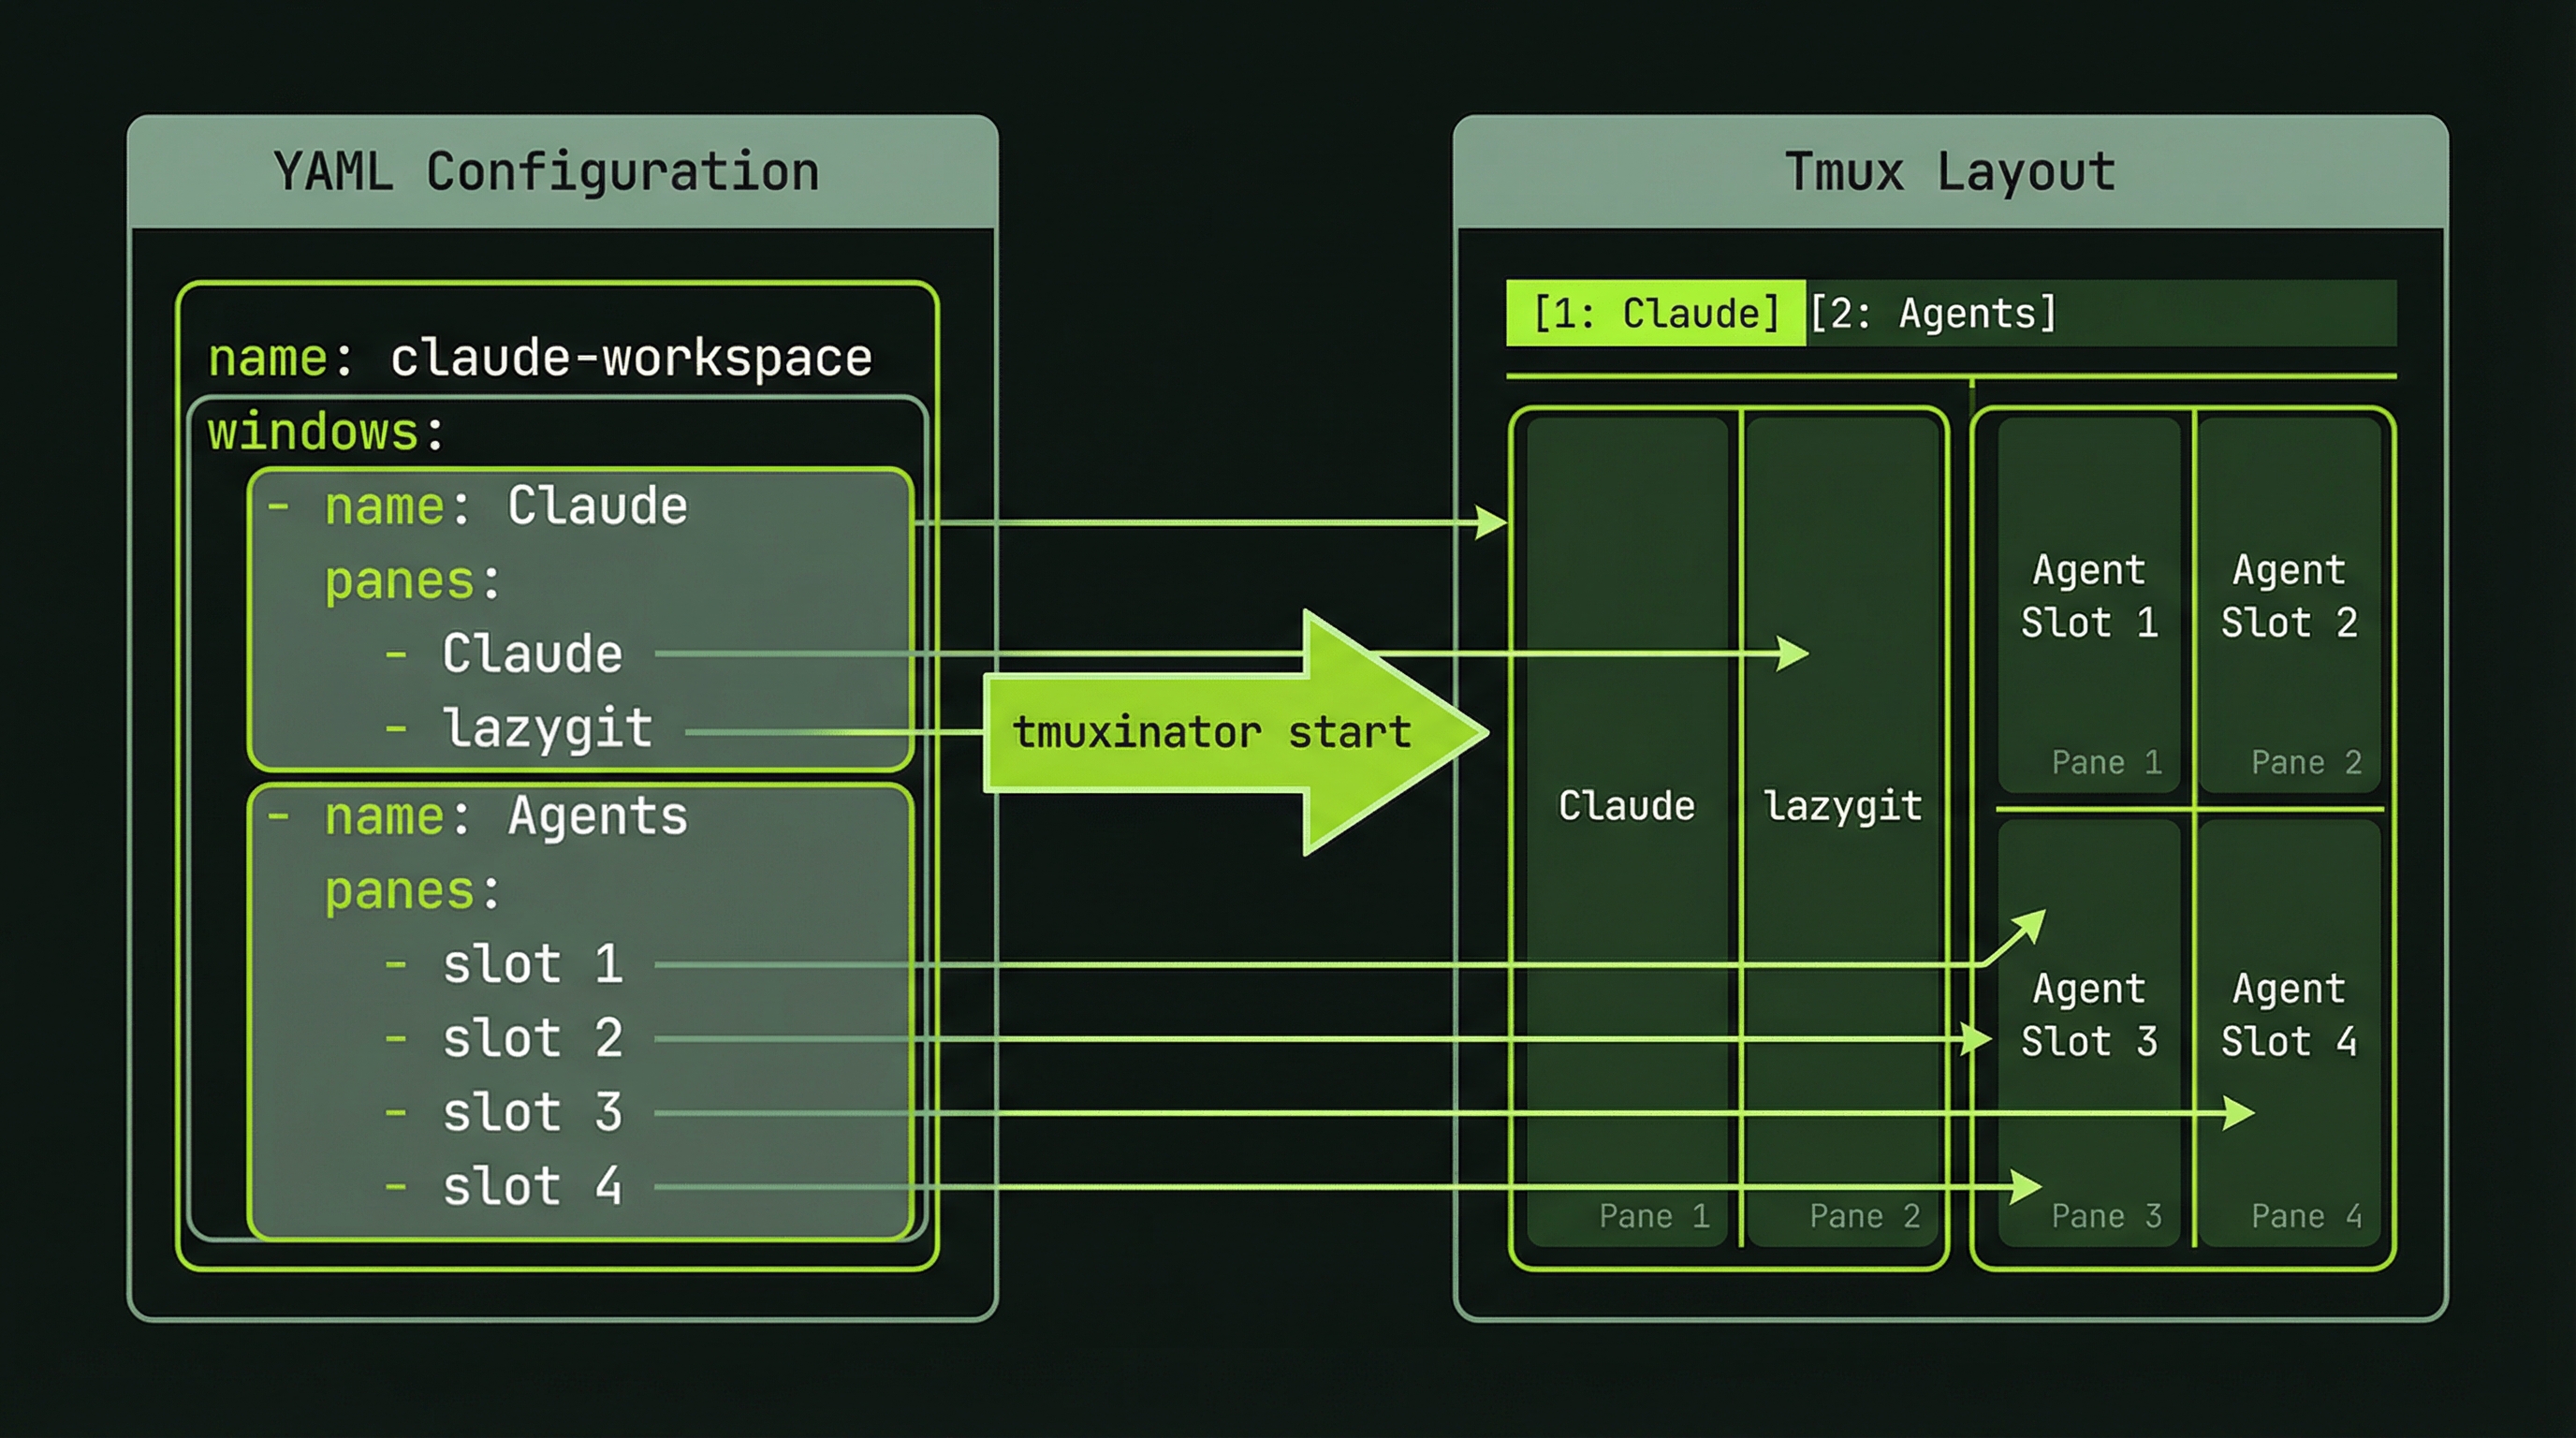
tmuxinator solves this. You describe your workspace in a YAML file once. After that, one command rebuilds it exactly.
tmuxinator reads a YAML config file describing your sessions, windows, panes, layouts, starting directories, and startup commands. It talks to tmux and builds everything you described. Configs live in ~/.config/tmuxinator/ so they persist forever and can be version-controlled.
Exercise 1: Install tmuxinator
Install tmuxinator on your system
Pick the method for your OS:
# macOS
brew install tmuxinator

# Ubuntu / Debian
sudo apt install tmuxinator

# Any system with Ruby gems
gem install tmuxinator
Verify it installed correctly:
tmuxinator versionYou should see output like tmuxinator 3.x.x. If you get "command not found", check that your gem bin directory is on your PATH — this is the most common issue with the gem install route.
On macOS, Homebrew is the easiest path — it handles Ruby for you. On Linux, sudo apt install tmuxinator bundles everything.
Exercise 2: Your First Layout Config
Create a basic 4-pane config
tmuxinator's new command creates a config file and opens it in your editor:
tmuxinator new claude-agentsYour editor opens with a heavily-commented template. Delete everything and replace it with this:
name: claude-agents
root: ~/projects/my-app

windows:
  - agents:
      layout: tiled
      panes:
        - echo "Lead Agent pane"
        - echo "Agent 1 pane"
        - echo "Agent 2 pane"
        - echo "Agent 3 pane"
Save the file and close your editor. Now launch the workspace:
tmuxinator start claude-agentsFour panes appear in a tiled grid. Each one ran its echo command on startup. This is what took six manual keystrokes before — and it will work identically every single time you run that command.
Understanding each field:
- name — the tmux session name. Used to start, stop, and reference the workspace.
- root — all panes open in this directory unless overridden.
- windows — a list of windows. Each window is a full-screen tab in the session.
- layout — how panes are arranged.
tiledcreates an equal-sized grid. - panes — shell commands to run on startup. Use
-for an empty shell.
Stop the session when you're done exploring:
tmuxinator stop claude-agentsExercise 3: A Real Agent Workspace Layout
Build a three-window production workspace
The minimal config worked. Now build something you'll actually use for Claude Code agent sessions. Create a new config:
tmuxinator new claude-workspaceReplace the template contents with this:
name: claude-workspace
root: ~/projects/my-app

windows:
  - code:
      layout: main-vertical
      panes:
        - claude          # Lead agent — big pane on the left
        - lazygit         # Git review — right sidebar
  - agents:
      layout: tiled
      panes:
        - echo "Waiting for agent team..."
        - echo "Waiting for agent team..."
        - echo "Waiting for agent team..."
  - logs:
      panes:
        - tail -f ~/.claude/logs/*.log
Save and launch:
tmuxinator start claude-workspaceYou now have three windows:
- code — Claude running in the main pane, lazygit in a right sidebar. This is where you direct the lead agent.
- agents — three panes waiting for agent teammates to spawn into them.
- logs — tailing Claude's log files so you can see exactly what's happening in the background.
Navigate between windows:
Ctrl+B then n          # next window
Ctrl+B then p          # previous window
Ctrl+B then 0          # jump directly to window 0 (code)
Ctrl+B then 1          # jump directly to window 1 (agents)
Ctrl+B then 2          # jump directly to window 2 (logs)
The entire workflow lives in one session. You never need to open a new terminal window.
Layout Types Explained
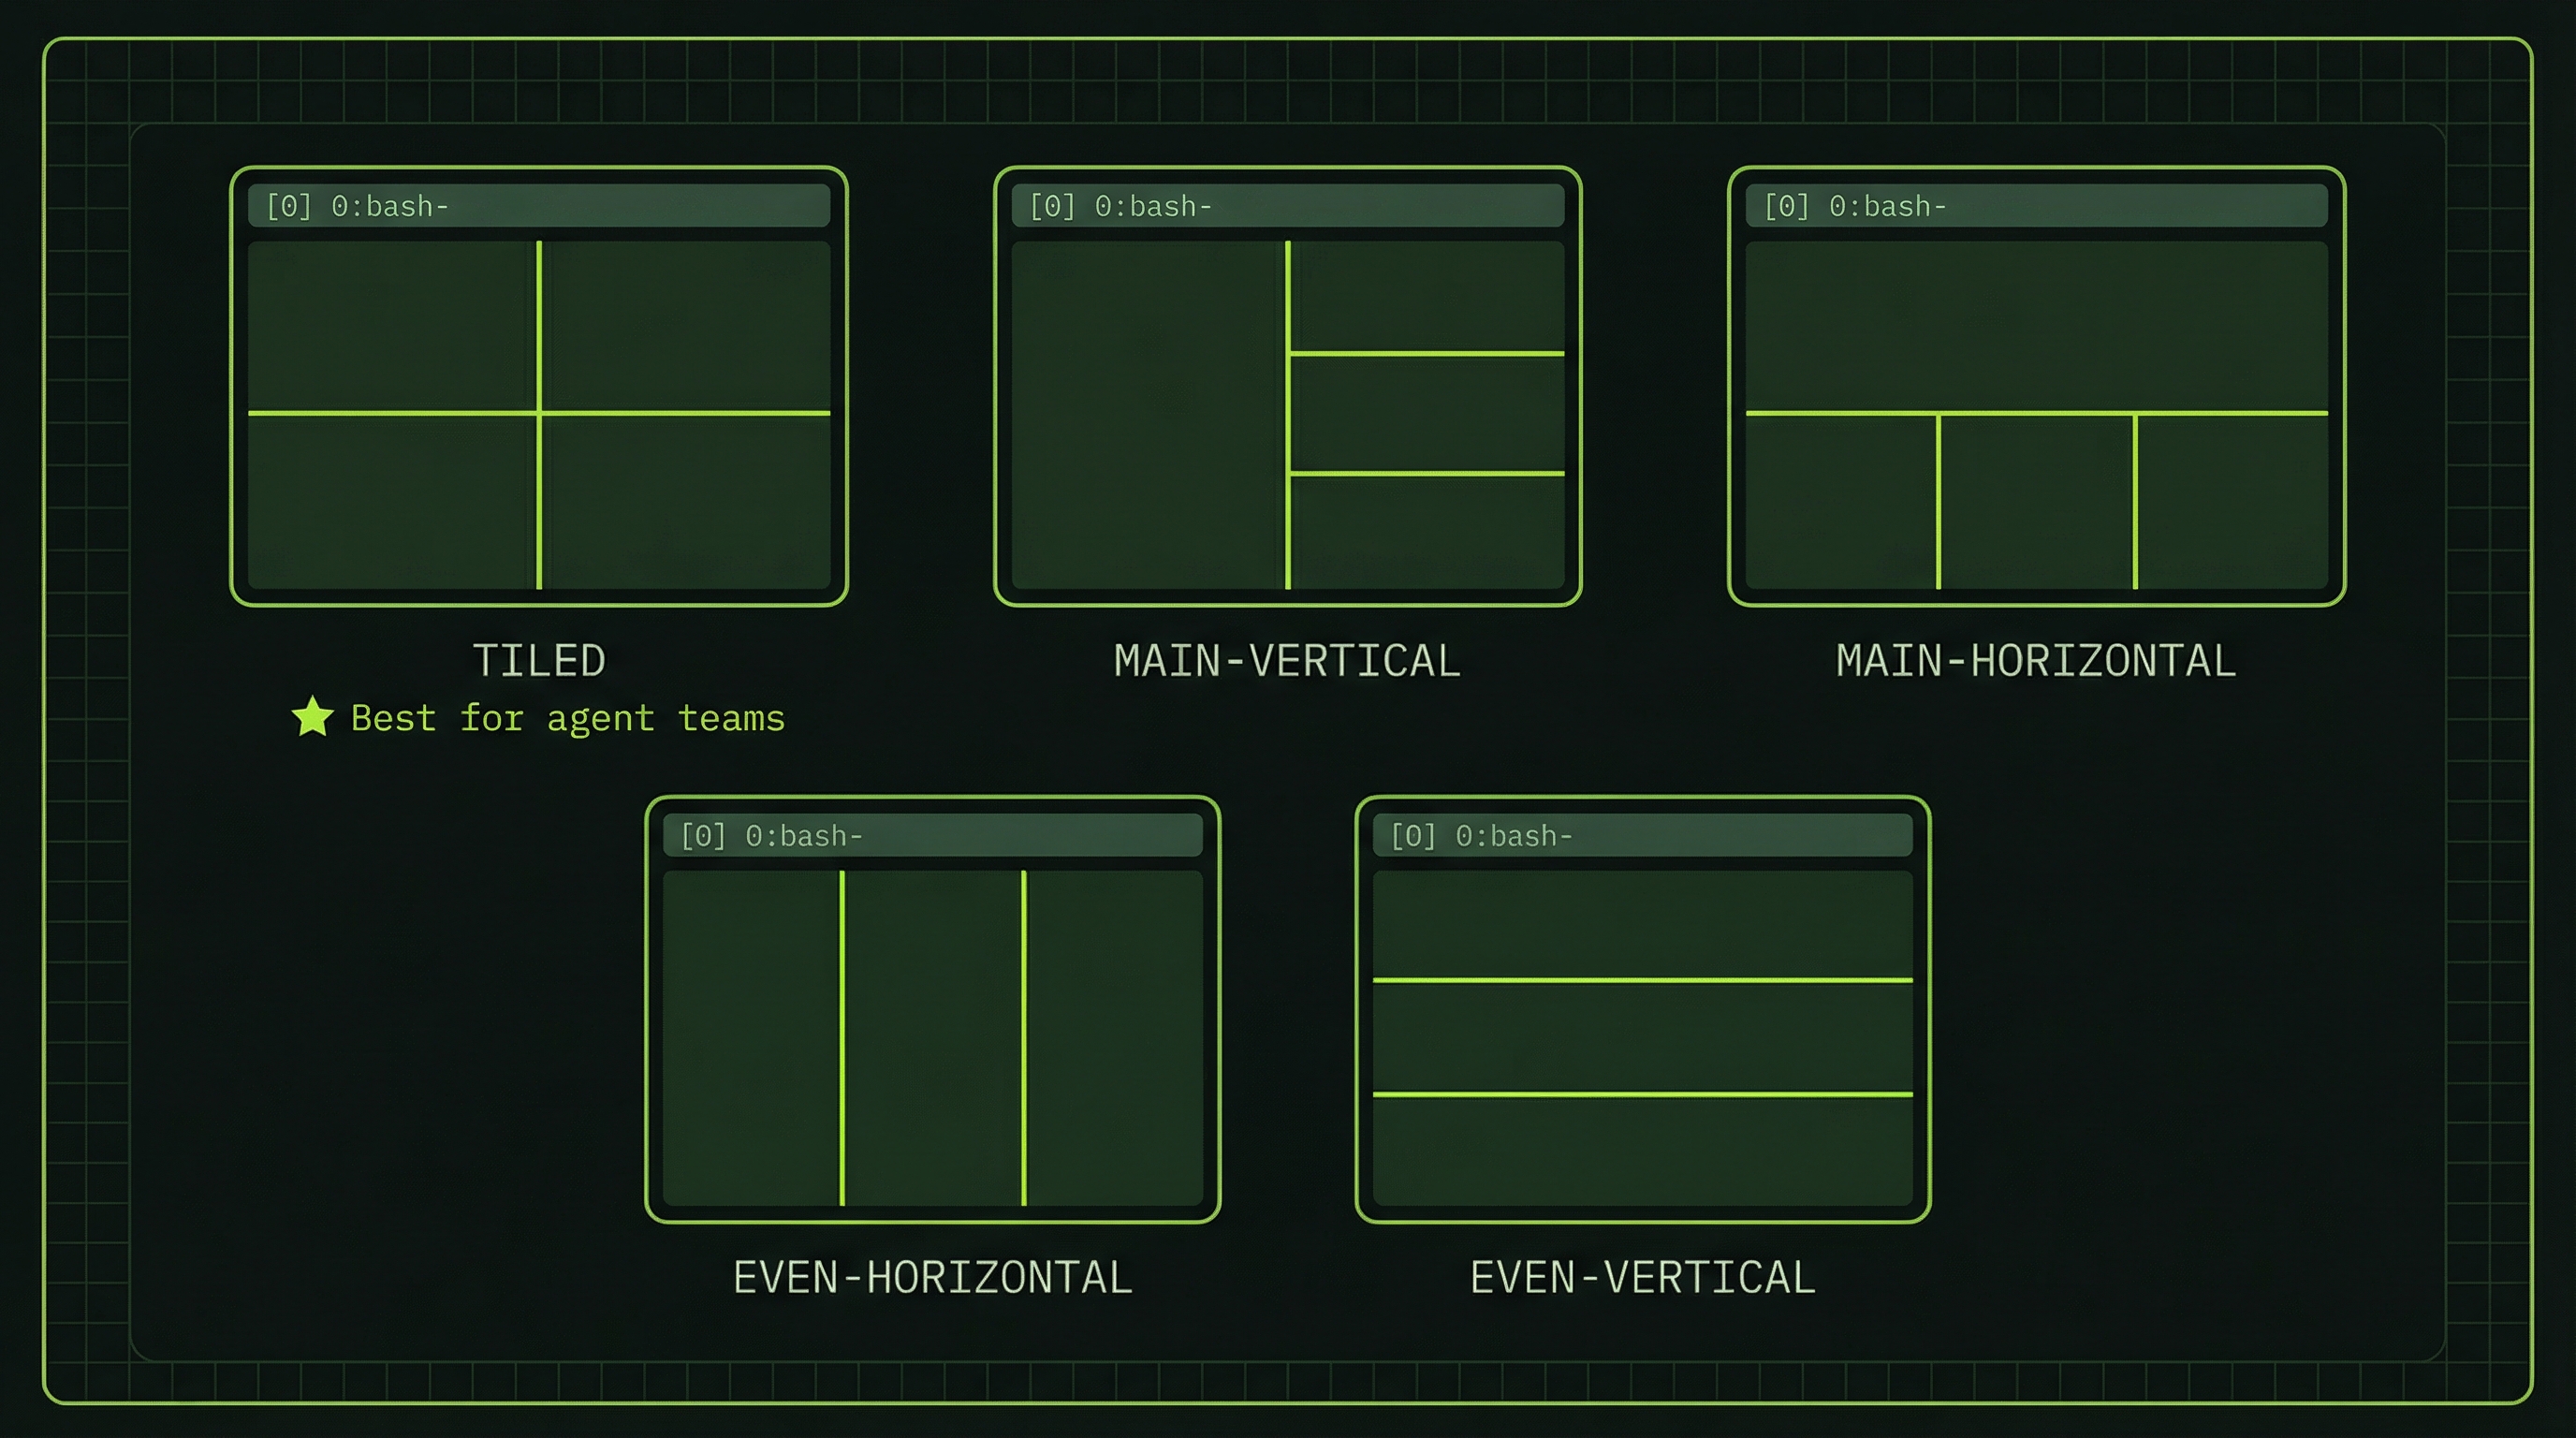
tmux has five built-in layout algorithms. Choosing the right one makes a real difference for readability — especially when agents are running in parallel and you need to scan multiple output streams quickly.
For agent teams with 3–4 agents, tiled is almost always the right choice. For a lead agent with a companion tool (lazygit, logs, tests), main-vertical gives the primary pane the space it needs to be readable.
Exercise 4: Project-Specific Workspaces
Manage multiple workspace configs
Real work involves multiple projects. Create a second config for a different one:
tmuxinator new my-apiGive it a different root and a pane setup that matches that project's workflow. Then use these commands to manage all your configs:
# List all saved configs
tmuxinator list

# Open a config in your editor
tmuxinator edit claude-workspace

# Start a workspace
tmuxinator start claude-workspace

# Stop a workspace (tears down the session)
tmuxinator stop claude-workspace

# Delete a config permanently
tmuxinator delete my-api
Add shell aliases so you can launch workspaces instantly. Add these to your ~/.zshrc or ~/.bashrc:
# One-command workspace launch
alias cw='tmuxinator start claude-workspace'
alias ca='tmuxinator start claude-agents'
After reloading your shell (source ~/.zshrc), typing cw spins up your entire Claude workspace. That's the goal: launching your workspace should cost zero thought.
Session Persistence: tmux-resurrect
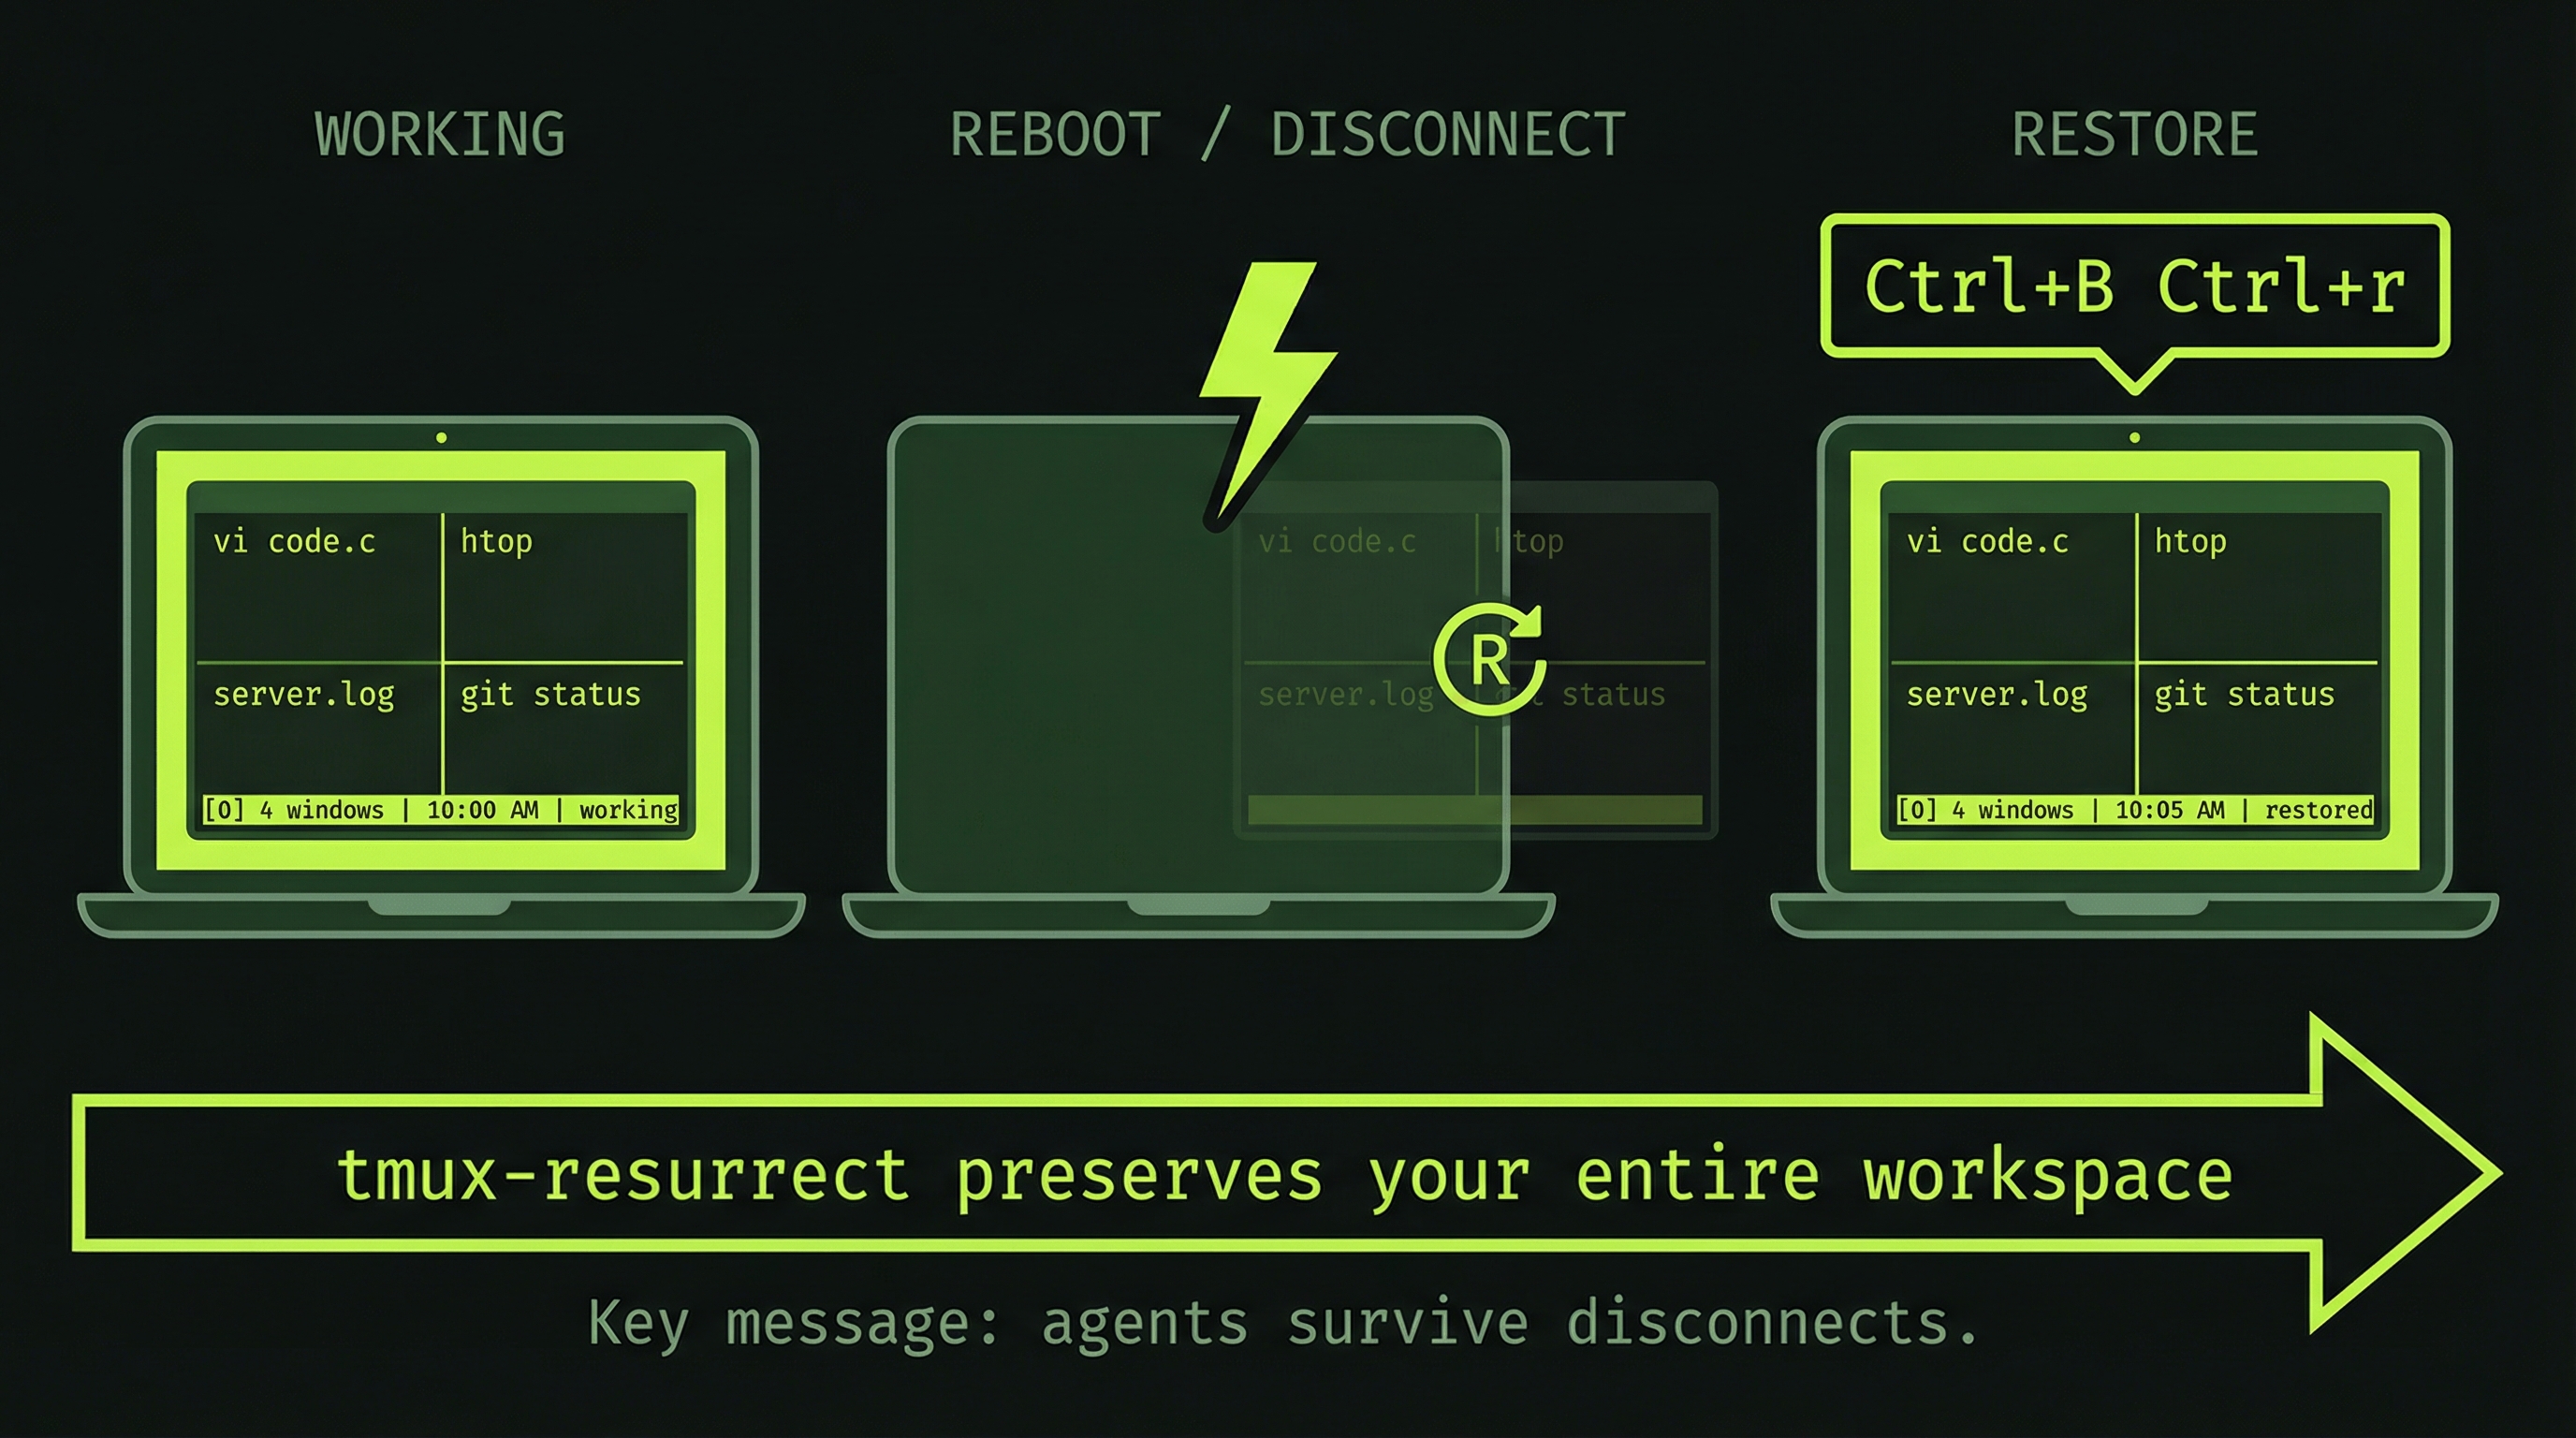
tmuxinator solves one problem: rebuilding your layout. But there's a second problem — what happens when your machine reboots? tmuxinator can relaunch the layout, but it can't restore the state that was running inside each pane. Any work-in-progress context inside your panes is gone.
tmux-resurrect saves your entire session state to disk: all panes, all directories, all running programs. On reboot, one keystroke brings everything back exactly as you left it.
Install tmux-resurrect via TPM
First, install TPM (tmux Plugin Manager) if you haven't already:
git clone https://github.com/tmux-plugins/tpm ~/.tmux/plugins/tpmAdd these lines to your ~/.tmux.conf:
# tmux Plugin Manager
set -g @plugin 'tmux-plugins/tpm'

# Session persistence
set -g @plugin 'tmux-plugins/tmux-resurrect'

# Initialize TPM (keep this at the very bottom of tmux.conf)
run '~/.tmux/plugins/tpm/tpm'
Save the file. Now source it and install plugins from inside a running tmux session:
# Reload your tmux config
tmux source ~/.tmux.conf

# Then, inside a tmux session, install plugins:
Ctrl+B then I
TPM downloads and installs tmux-resurrect. You'll see a status message at the bottom of your screen when it finishes. You now have two new keybindings:
| Keys | What it does |
|---|---|
| Ctrl+B then Ctrl+s | Save the current session state to disk |
| Ctrl+B then Ctrl+r | Restore the last saved session state |
Save your current session now: Ctrl+B then Ctrl+s. A confirmation line appears at the bottom of your screen.
To test the restore: kill your tmux server, start a fresh session, then press Ctrl+B then Ctrl+r. Your workspace — all panes, all directories — comes back exactly as you left it.
Optional: tmux-continuum (Auto-Save)
tmux-resurrect requires you to save manually. tmux-continuum automates this — it saves your session every 15 minutes and optionally restores your last session when tmux starts. A reboot becomes a complete non-event.
Add this to your ~/.tmux.conf after the resurrect plugin line:
set -g @plugin 'tmux-plugins/tmux-continuum'

# Automatically restore the last saved session when tmux starts
set -g @continuum-restore 'on'
Press Ctrl+B I again to install. After that, saves happen in the background every 15 minutes without any action on your part.
tmux-resurrect saves pane layout and restores each shell to its correct directory, but it cannot resume a Claude Code process that was interrupted mid-run. Use resurrect to get your workspace back instantly after a reboot, then relaunch your agents from the restored layout.
Your Workspace Is Ready
Step back and look at what you've built across these three modules:
- Module 2: tmux for persistent, multi-pane terminals. Each agent gets its own pane. You can scroll, navigate, and observe without disrupting running processes.
- Module 3: lazygit inside tmux for reviewing agent commits without leaving your workspace.
- Module 4: tmuxinator for one-command workspace launch. Your layout is defined in YAML, version-controllable, and perfectly reproducible.
This is the infrastructure layer for agent work. The next module covers why multi-agent architecture matters — the conceptual foundation behind everything you've been building toward. And in module 6, you'll use this exact workspace to run your first real agent team.